SewCalGal is at it again: another super fun blog week. This time it’s all about EQ.

Today it’s my day! I thought for my project, I would play around with making Christmas ornaments. I’ll break this up into two parts: one, designing in EQ and two, making up the ornament.

There are so many possibilities for these ornaments, but for this venture, I kept it simple with circles.
Create the Design in EQ7
To begin, create a new block: EasyDraw + PatchDraw. On the EasyDraw worktable, draw a circle using arcs.

Select all four arcs and resize the circle at 90%. Move the circle down and add a rectangle at the top. Save in the Sketchbook.

How easy is that? Now it’s time to add applique to the center. To begin, I did a Category search in the Block library for Christmas blocks. I moved a few simple ones into the Sketchbook – choosing both applique blocks and pieced blocks. For the moment, though, we’re just going to play with some applique.
1) Open one of the applique blocks onto the worktable. Select All and Copy.
2) Once again open the circle ornament on the worktable. Click the Applique tab and then click paste. The applique will be added.
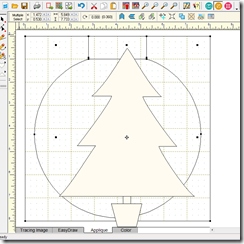
3) The applique, of course, is too large. Just grab the corners to resize and then reposition to center it. Save in the Sketchbook.

4) I printed my ornaments as a block sized at 4" square. Because of the technique I’m using to sew them up, I printed onto a printable stay-in foundation. I also printed a template sheet.

Assembly
1) I began by making the topper to the ornament. Cut two rectangles 1" by 1 3/4". Cut a hanging cord 8" long.
2) Fold the cord and line up along the edge of one of the patches. (If you look closely, you’ll notice little glue dots. That’s because Roxanne’s Glue Baste-It is my best buddy. Little dots of glue in the seam allowance holds everything in place when I sew the little pieces together.)

3) Place the other rectangle right sides together. Sew the two sides and the top. After sewing, trim the corners.

4) Turn right side out. (I forgot to take a picture of this but it’s pretty self-explanatory, right?)
5) Trace the applique pieces onto fusible web and iron onto your fabric. Cut out to size. (Okay, so I’m presuming you all know how to work with fusible applique).
6) Place the foundation printed side up on a lightbox. Place a background fabric over the foundation. (I used a charm square so it’s larger than I need. You could get away with a smaller piece).

7) Place the patches in place and then iron to fuse.

8) Cut out a circle of fusible fleece that is a little smaller than the printed circle and fuse onto the back of the foundation.

9) If you are so moved, stitch the fused applique pieces down. (Another picture I forgot to take. I plead grading-head. Essays. Midterm Exams. Occupational hazard.)
10) Take the ornament top and place it on the fabric side of the ornament, raw edges to the top. (I use a couple glue dots to hold it in place). Be sure that the cord is inside the circle.

11) Cut two backing pieces for the ornament 2 3/4" by 4 1/2". For one of the pieces, fold the long edge under 1/2" and press.

12) Place the folded backing on the fabric side, right sides together.

13) Now place the second backing piece down.

14) Flip the foundation over and sew on the circle all the way around.

15) Trim away the excess, leaving about a quarter-inch seam allowance.

16) Turn right side out. There will be an opening left from where the two backing pieces overlap. You could hem-stitch it closed. Me, personally, I avoid hand sewing whenever possible. I used a quarter-inch strip of fusible web to close the opening.

And there you have it: cute little ornaments easy as can be.
***
But what about the pieced blocks, you ask? Well, this is already plenty long so I’m going to give the shortened version. Go back to the very first circle you drew. Or open a new Easy Draw block and draw a circle there.
Then, draw a square inside the circle.
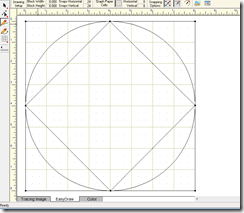
From here, you can use the merge feature to add blocks to the center of the square. There are so many possibilities. Here are just a few.
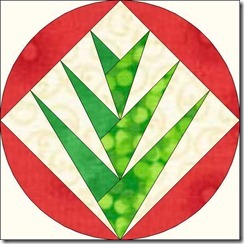


Now, if you try and print these as a foundation pattern, it won’t work. The block you merged in won’t show up. However, if you print it as a
Block, you will get everything you need.
I printed this one a little smaller: 3" square.

And you could do the same with heart shapes, or hexagons, or diamonds. You could take a simple circle and add stripes and triangles and geese. You could simplify further and make them out of wool. So many possibilities . . .
And, of course, we need a giveaway. I’ll let Mr. Random Generator pick a winner this Saturday evening. So, if anyone is interested, let me know and I will enter you in the drawing. If Mr. Generator picks you, I’ll send you a packet of printed foundations to play with.
Meanwhile, there’s more blog hopping ahead. Be sure to check out these other fun ideas:
Monday, Oct lst SewCalGal Beaquilter
Tuesday, Oct 2nd Marjorie's Quilting Bee
Curious Orange Cat
Wed., Oct 3rd Love Bug Studios
Thursday, Oct 4th Kissed Quilts
Bits & Pieces (you are here!)
Friday, Oct 5th I Quilt Scarlett & Grey
EQ Blog:
http://www.doyoueq.com/blog/
And, as always, thanks to SewCalGal for organizing such a fun week!


