Tuesday, February 23, 2010

Progress on Doll Quilt Swap 8

I finished the top.  Now there is just the quilting designs to figure out.  I am very happy with how this came out.  I had a terrible time getting color right on the photo though.  Photoshop didn’t much care for it either.  It wanted to turn the colors a truly awful glowing green-blue.  Gruesome.  The actual quilt colors are muted but not quite this muted.  Oh well?

I am very, very happy with this.  The blocks are 2 1/2" square.  The entire quilt just a little under 18" square.  This is all I have time for today but either tomorrow or Thursday I’ll get it quilted.  I’ll hop into EQ to get some motifs.  I’m thinking something curvy and classic for the outer border. 

Speaking of EQ.  I’m going to have some fun this Saturday.  I’m teaching a class on Designing with EQ at my local quilt shop.  It’s all about playtime!

Monday, February 22, 2010

The Round Robin Begins

One of my quilt groups has decided to play with a round robin.  We’ve done them in the past.  When our group first started we were so excited we dove right into a round robin and did two round robins projects back to back.  We slowed down a bit after that.  We’ve been taking a break from group projects for a while, so it’s a bit of fun to be up and running again.

The first challenge, of course, is to come up with a central block.  I almost always choose an applique block.  I haven’t yet had the stamina to make an applique quilt, but I can, on occasion, manage a block.  I usually make my centers bigger than this so I thought this time I’d start with something smaller.  This will finish at ten inches square. 

The block design is the center area of a block from the book Simple Blessings by Kim Kiehl.  I practiced some machine applique and chose a very simple design with oh so gentle points and curves.  It took me far longer than I thought it should and made me respect and admire you beautiful appliquers all the more. 

The fabric I chose is incredibly cute, Whimsy by Fig Tree Quilts.   Love it!

I’ll have to admire it in the photos from here on out though.  I won’t see my quilt again until the round robin-ing is done – which could be anywhere from six months to a year (we’re a pretty relaxed group!).  Once we’re all done and it’s okay to show, I’ll have to post pictures of how everyone’s quilts turn out.

Meanwhile, the countdown is on for Doll Quilt Swap 8.  Thank heavens I finally got the pattern I wanted!  The pincushions and little nine patches inspired me and I’m working with blocks this time instead of an entire foundation.  Here it is in process.  Love those little blocks!  They’ll finish at two-and-a-half inches square.

Tomorrow, I make up some more blocks and put the top together.  More pictures to come!  It’s such a relief when the design comes together. 

Sunday, February 21, 2010

A Little Irish Love

Like most Americans, I’m a bit mongrel.  On my father’s side, it’s all Czechoslovakian.  On my mother’s, it’s all Irish.  My Nanny came from Ireland.  She died before I was born, and I’m sorry I never got to meet her.  I’ve heard stories about her though.  She married a ne’er do well and so needed to take care of herself and her daughter.  For years she ran a boarding house for firemen and policemen. In Brooklyn.  (Irish American enough, do you think?)

nanny web

My brother says she had a close relative  hung by the British.  During World War II when Winston Churchill would come on the radio, she didn’t, shall I say, exactly root for England.  My father, who was stationed in England, just laughed.

She was mother to Josephine, my Grammy.  (More on Grammy another day).  Grammy married Stephen Lynch who had come from Ireland with his brothers. 

grammy and stephen lynch web

I love this photo, how Grammy looks so assured and serene, while my grandfather looks like he can barely stop long enough for the photo to be taken.  Did he know he didn’t have long to live?  He died of tuberculosis when my mother was only a year old.  Though my Mom’s name was Florence, I grew up hearing my Dad and all her friends call her Micky.  It didn’t occur to me to wonder about this for the longest time, so I was in my teens before I heard the story, how when she was a baby, her father rocked her on his lap, laughed, and called her his little Irish Micky.   Then Mom explained that the term “Mick” was actually a racial slur against the Irish.  Huh.  She laughed, too.

And here I am, hoping and wishing I get to Ireland someday.  I want to visit.  Oh, very, very much.  My brother has gone several times and, not being at all shy, has wandered into pubs and asked about the Lynches and where in Ireland do they hail from.  I am not quite that outgoing.  But I do want to breathe that air. 

So, here’s my little Irish quilt.  Green for Ireland.  The Irish Chain for obvious reasons.  The background fabric is flecked with gold metallic and I chose it to suggest a bit of leprechaun treasure.  The quilting, though tiny, is meant to at least hint of Celtic knots.  Oh, I’m looking forward to putting this up for St. Patrick’s Day.

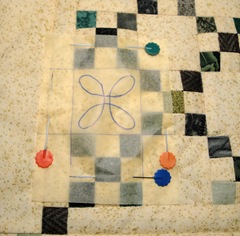
It’s hard to see the quilting in the photo.  I used these EQ motifs.

irish chain borders

I knew I was going to finagle just a little in the middle of the border section but not bad.  I quilted everything in the ditch and then did the little nine patch blocks, using Golden Threads tissue paper as usual.

Then I went for the borders.  I made a bit of an oops as I was drawing the bottom border so I switched to the blue ink in my tracing so I knew which lines to follow.

I finished with some gentle curves in the narrow borders.  Oh, I like this one!  I’m hoping this doesn’t sound arrogant, but really, the photo doesn’t do this justice.  It’s way cute.  I’ve got more ideas for nine patches coming up.  For instance, it’s been a bit since I’ve indulged my Kaffe Fasset love.  Hmmmm.  But for now, how about ending with an Irish Blessing?

May the lilt of Irish laughter Lighten every load,

May the mist of Irish magic Shorten every road,

May you taste the sweetest pleasures That fortune ere bestowed,

And may all your friends remember All the favors you are owed.

Thursday, February 18, 2010

Nine Patch Fun

Those pincushions got me thinking.  If I can make four separate little (little) quilts, I could make little (little) blocks.  Like these:

And these:


These blocks will finish at 1 1/2" square.  Now, normally, the whole point of the quilts in Miniatures in Minutes is that you can make the entire foundation pieced section of the quilt (sans borders) on a single foundation.  I fell in love with that technique because it meant I could make miniature quilts without having to do the really fussy sewing and matching that comes with miniatures.  When I make my miniature quilts, I never use a pin.

But, hey, why not experiment?  So, I decided to try using the foundation to make nine patch blocks that would then need to be pieced more traditionally.  Here’s how it worked:

First, I made up a Quilt Layout Diagram for the 13 Square foundation.

13 Square 9 patch blocks

It looked like there was a fair amount a room for me to get challenged during the sewing process (always a consideration) so I made sure to mark up the foundation.  I drew little blue arrows to indicate which lines to sew (this actually helped a great deal) and green squiggly lines across the foundation to remind me not to join these rows.  (Am I the only one who goes space cadet at the sewing machine?  I tend to get in a rhythm and just keep sewing without much thinking about it – hence the occasional disaster.  Marking the foundation before I get to the machine makes my life much easier!)

Here’s what the foundation looked like with two columns of nine-patches added and the first patch set  of the last column in place.

Here’s with all the patches added:

Here it is with the rows joined:

I just love how fast and easy Fold and Sew is!  I suspect I don’t really have the patience to make such little blocks using traditional methods.  These were definitely fun though.  So far, so good.  But then, Terrie made an oopsie:

Oh, that made me very sad.  I’m not even sure how I did it.  Though, I have to say, given all of the little quilts I’ve made using this method (and that would be a lot), this is the first time I have ever sliced through fabric while it was on the foundation.  Would you believe?  I never have.  This goes to the “A First Time For Everything, Gol Darn It” category.  I can’t whine too much though, at least it wasn’t an entire quilt! 

I had made up two of these foundations so I had enough of the green nine patch blocks to reach my goal.

I’m mostly wishing I hadn’t added that first inner border with the single patch.  (Oh, well).  Once I added the first two borders, I decided I needed just one more to have a little breather before the binding would go on.  The outer border is now a little bigger than it will finish at.  I’ll trim after I quilt.

This one is meant as a tribute to my Irish roots, but I’ll write more about that when I get this quilted.  Meanwhile, happy piecing all and may the luck of the Irish be with you! 

(Okay, now where did that saying come from?  I mean, how lucky were the Irish, anyway?  The troubles?  The famine?  A whole pile of grievances to level at the English?  Perhaps it’s because despite it all, Ireland is just so breathtakingly beautiful . . .  the land and the people).

Sunday, February 14, 2010

Miniature Quilt Pincushions

Or perhaps I should call this Christmas in February?  (We have the “white”  part down).  Once again thinking I’d like to be ahead of the game for little gifts, I made up these pincushions.  The pieced squares finish at one-half inch and the pincushions themselves range from about 5 to 6 inches square.

I used the 13 Square foundation from Miniatures in Minutes.  Click here to download a pdf file with detailed directions from the Projects 2010 page of my website.   Here are a few of the process photos. 

I’m always thinking about new ways to use the foundations from Miniatures in Minutes.  For these pincushions, I only used part of the foundation.  I still created Quilt Layout Diagrams.

13 Square Pincushion layout

13 square pincushion 2 layout

But, honestly, I just laid my patches out as I wanted to piece them and set up next to my sewing machine.

Here’s what the foundations look like with the patches all added (but before the rows are sewn together).

And here’s what they look like after the rows have been joined.  You can see how I used only part of the foundation with both sets of designs.

And here they are, paper removed, ironed, and ready for borders:

I added either one or two narrow borders, depending on fabric selections.  These two are my favorites.  I just love the colors  in this one: 

And I always love Japanese taupe.  So soft and pretty:

For the record, I used two different fillings.  For a couple, I just used regular poly fill.  These make for very poufy pincushions.  For the rest, I used crushed walnut shells which I find at the local pet store.  The shells are packaged as terrarium ground cover (for lizards, no less), but they make great pincushion filler – weighty and solid, small but not as small or dense as sand.  I’ll admit, I’m a bit messy with the shells.  No matter how hard I try to be neat, I always spill.

And just because, here’s a couple more close ups: 

Right now, these little guys are sitting in a pile on my sewing table.  The colors are just so bright and happy, they make me happy!

Monday, February 8, 2010

EQ6 and Rouenerries, Take Two

Couldn’t resist and did some more playing.  I thought I’d demonstrate here the way EQ helps me evolve a design.   So, this came along:

star and sixteen patch

Very sweet and traditional.  Then I wanted to try something more lap quilt size.  So I put the design on point and used the frame I had created last time in the setting triangles.

on point stars 2

Then I wondered about switching the placement of the stars and sixteen patch blocks.

alt stars 4

Which I didn’t care for, though I liked the look of the stars in the corners.  So I decided to try keeping the stars in the corners but having the rest be squares except for a single star in the center. 

five stars outlined

Then I wondered what it might look like if the framing outline was also patched on the 16 patch grid.  After modifying the setting triangle blocks, I had this:

five stars patch outline

Just a little more modification now: floating four patch blocks on Layer 2 to see what it would look like if the frame extended out into the border.

patch into frame 5 stars

A little more color play:

star color play 

Or perhaps putting some of the stars back in?

on point stars

Whew!  That was a lot of fun.  There were actually some other takes but I didn’t like any of them and made them go poof! all gone.  It was time to bring in Monsieur Jeff’s most excellent opinion.  And doesn’t it figure?  He liked the first one I designed best.  So it looks like this is the go:

final

Though I’m pretty fond of some of those earlier takes, I will admit. And actually have some ideas floating about for more tweaks on the above designs.  Perhaps the jury is still out after all.  Any opinions here?

In any case, it was still a lot of fun doing all the playing in EQ.  And I like the effect of that patched outer frame that extends into the border.  I think I’ll be playing with that again (though I’ll draw a block for Layer 1 that creates the same effect).

But, while the fabric now sits all lovely and siren-like in my sewing room, Jeff did, rather plaintively, make noises about my finishing the pink quilt.  So, pink first.  Then Rouenerries. 

Speaking of Monsieur Jeff.  He just called to tell me the roads to campus and the sidewalks on campus are very slick, so I should be careful when I head out the door (before long).  I am very, very tired of ice.  I think by the time summer comes I may be still so traumatized by this winter I won’t even want ice in my ice tea!

Sunday, February 7, 2010

EQ6 and Rouenerries, Take One

I’m totally in love with this fabric line, and so even though most of the quilts I make these days require the barest smidgens of fabric to make, I indulged and bought a fat quarter of each of the ones my local quilt shop had in stock.  Now, what to DO with them? 

EQ6 makes it very easy to import images of fabrics into the program.  And Moda has made it very easy to get the images.  From the Moda website you can download a zip file of the fabric scans.  Easy peasy.  Once I import the fabric scans into EQ6, I can play with designing quilts using the exact fabrics I want and end up with a pretty good preview of what the finished quilt will look like. 

I taught a class in EQ6 just a couple weeks ago and one of the blocks that I discussed as an easy Serendipity block was this framed nine patch. 

nine patch framed

And then because I often like to work with blocks that are similar in design, I modified the block to omit the nine patch in the center.

framed block no outline

And put them together in an on-point layout using one of the automatic borders.

rouenerries quilt no outline

I’ve got lots more design play in mind before I decide on a pattern but I do rather like this as a beginning point.  I’m not real happy with the thick strips in the corners though.  I’ve got all new ideas in mind as well but clearly this one still needs some tweeking.  Of course, these fabrics are so pretty, I don’t believe it’s possible to go too far wrong.  And now?  Enough time on the computer for one Sunday morning.  I’m off to go for a walk (even though it’s snowing, though nothing like it is back East for which we are grateful) and then it’s time to get into the sewing room and start playing with real fabric instead of virtual. 

Black, White, and a Wee Bit of Red

That’s what Kimmie wanted for her swap blocks.  I love working with this color combination.  It’s so dramatic.  This first block design comes from the Kaleidoscope Collection from EQ. 

The second block some of you may recognize.  The center 6 inch square uses the Square-in-a-Square foundation from Miniatures in Minutes.  I had made up the block as a sample last summer and it has just been sitting around since.  The color combination was perfect for what Kimmie wanted.  I needed a block that would finish at 12" for Kimmie so I added the outer strips.  (Click here to go to the blog entry where I showed how to adapt the foundation from the book to make this block/quilt).

To see other blocks that have been made in this exchange, click here

One of my quilt groups is about to start a round robin.  I’ve been thinking hard about what to do for my center and what kind of theme to set up.  The red/black/white combo is certainly on the list! 

Saturday, February 6, 2010

Swaps and All

Oh, so much sewing yet to do.  But here’s a little that’s been going on.  Ruth received her Valentine sampler for the 6" to 12" swap so I can display it now.  The hearts on this are two inches square each.  I challenged myself to restrict myself to the fabrics in a charm pack (except for the white background) which is why the border is pieced – I really liked the effect of the slightly scrappy border.

For the Bee Pieceful block swap I made up a wonky star with the fabrics Jennifer sent to me.  Such an easy technique.  I can’t believe I haven’t made one of these before now.  I’m thinking a wonky star quilt done in batiks might be rather nice in my tv room (not that I have the time to throw in another project right now).

And then there’s the January S.T.U.D. swap.  Here’s the lovely little quilt that came to me from the Netherlands.  I simply couldn’t get a good picture on this one I’m afraid.  The fabrics are really luscious – it’s like looking through the leaves of a rain forest.  Thank you, Wendy!

And here’s the January quilt I sent out.  I’ve been in an Amish mood of late.  Can you tell?

I once again drew the entire quilting design on Golden Threads paper.  The straight lines are just there to help me orient the design.  (I do quilt in the ditch first to stabilize the little guy).

Here’s the paper set over the quilt:

I used the EQ quilting motifs library (again, of course) for the designs.  I love how easy that makes it to size my motifs exactly to the fit I want (which is otherwise a bit of a challenge with these minis).

Now I am off to the sewing room to sew up some blocks for another swap.  With any luck, I’ll be posting pictures tomorrow.